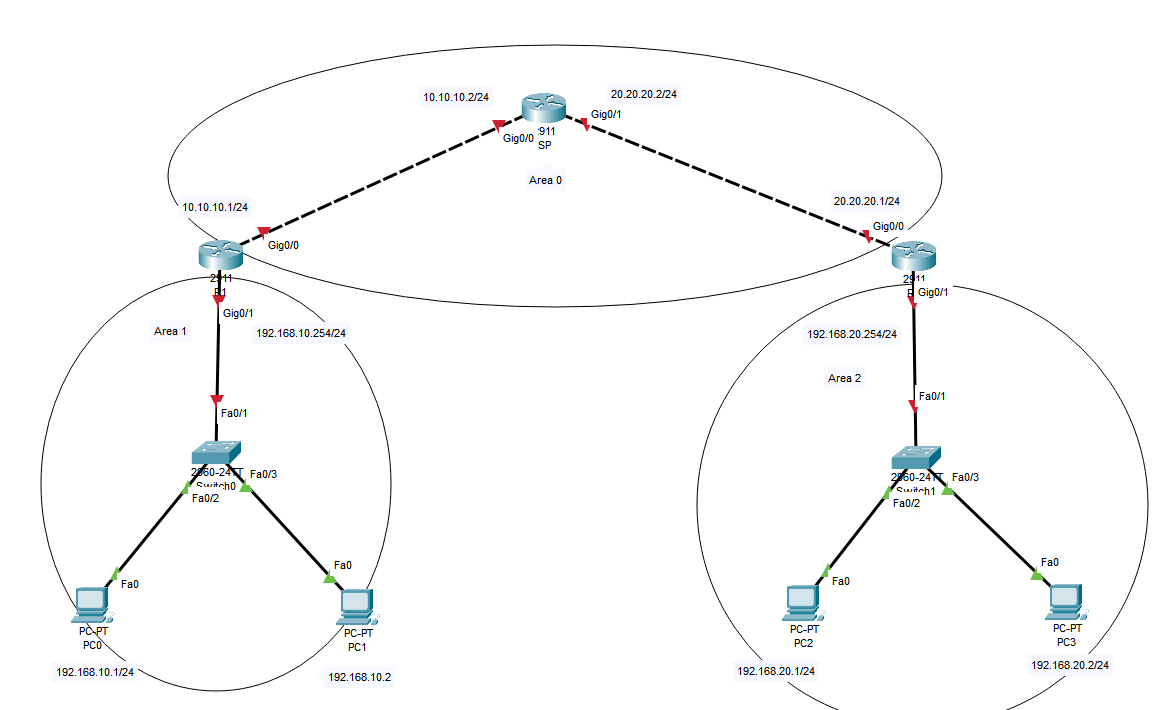

实验如上图所示
1 配置IP地址
R1配置
R1(config)#interface gigabitEthernet 0/0
R1(config-if)#ip address 10.10.10.1 255.255.255.0
R1(config-if)#no shutdown

R1(config)#interface gigabitEthernet 0/1
R1(config-if)#ip address 192.168.10.254 255.255.255.0
R1(config-if)#no shutdown
R2配置
R2(config)#interface gigabitEthernet 0/0
R2(config-if)#ip address 10.10.10.2 255.255.255.0
R2(config-if)#no shutdown

R2(config)#interface gigabitEthernet 0/1
R2(config-if)#ip address 20.20.20.2 255.255.255.0
R2(config-if)#no shutdown
R3配置
R3(config)#interface gigabitEthernet 0/0
R3(config-if)#ip address 20.20.20.1 255.255.255.0
R3(config-if)#no shutdown

R3(config)#interface gigabitEthernet 0/1
R3(config-if)#ip address 192.168.20.254 255.255.255.0
R3(config-if)#no shutdown
2 配置OSPF
命令注解
R1(config)#router ospf ?        //启用OSPF进程
<1-65535>                               // 进程号范围1 - 65535
R1(config)#router ospf 1
R1(config-router)#network      //宣告网段
格式: network <相邻网段> <反掩码> <区域号>
区域号为0是核心区域(骨干区域)
R1配置
R1(config)#router ospf 1
R1(config-router)#networ 10.10.10.0 0.0.0.255 area 0
R1(config-router)#networ 192.168.10.0 0.0.0.255 area 1
R2配置
R2(config)#router ospf 1
R2(config-router)#network 10.10.10.0 0.0.0.255 area 0
R2(config-router)#network 20.20.20.0 0.0.0.255 area 0
R3配置
R3(config)#router ospf 1
R3(config-router)#network 20.20.20.0 0.0.0.255 area 0
R3(config-router)#network 192.168.20.0 0.0.0.255 area 0
在所有路由器配置完成我们可以查看一下路由表
R1为例
R1#show ip route ospf
     20.0.0.0/24 is subnetted, 1 subnets
O       20.20.20.0 [110/2] via 10.10.10.2, 00:01:26, GigabitEthernet0/0
O    192.168.20.0 [110/3] via 10.10.10.2, 00:01:16, GigabitEthernet0/0

↑ 这个O代表 OSPF
这边可以看到成功获取到了 20.20.20.0和192.168.20.0网段的路由
3 测试
PC0 与 PC2 的连通测试

PC1 与 PC3的连通测试
